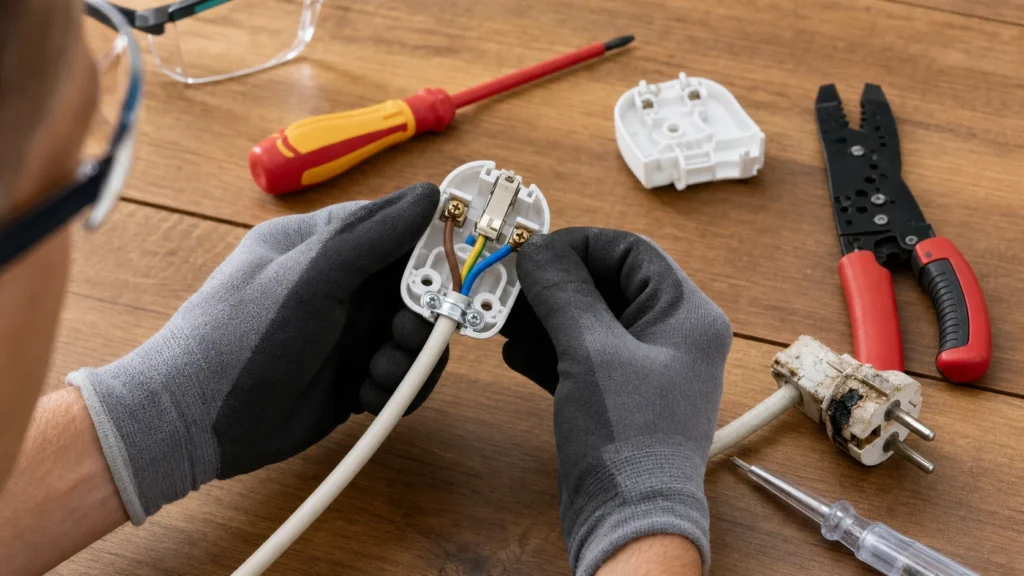
A cracked or burned plug isn't something you fix with electrical tape—that's just a temporary patch that can arc before long. Replacing it with a modular plug from the hardware store takes fifteen minutes and is completely safe, since you're working on the cable while it's unplugged from the wall. The only thing you really need to watch is connecting the wires by colour and making sure the yellow-green (ground) ends up on the right terminal.
You don't need special knowledge – just carefully strip the insulation without nicking the wires and remember the colour sequence: blue is neutral, brown is live, and yellow-green is ground.
⚠ Safety note: This guide involves working with electricity. If you're not completely sure about every step, stop and call a licensed professional. Before you start, always switch off the power at the breaker or close the main water/gas valve.
1 Disconnect the appliance from power
Pull the appliance plug out of the wall outlet. If you can’t pull the cable from the outlet because the appliance is permanently connected, switch off the breaker that powers that outlet in your breaker panel first.
2 Cut off the damaged part
If only the plug is broken and the cable is fine, cut the cable right behind the old plug with wire cutters; if the damage is on the cable itself, cut it a few centimeters past the damaged spot.
3 Strip the outer sheath and insulation
Strip about 4–5 cm of the outer cable sheath, then strip about 1 cm of insulation from each of the three inner wires, being careful not to nick the copper strands.
? Tip: If your appliance has a metal housing (like a water heater, washing machine, or vacuum), the cable must have a third wire for ground protection connected to earth – never use a plug or extension cord without earth protection for such appliances.
4 Open the new plug
Unscrew the screw holding the plug housing and pull out the terminal block with three terminals.
5 Connect the wires by colour
Connect the brown (or black) wire to the terminal marked L (live), the blue to N (neutral), and the yellow-green to the ground terminal; tighten each screw firmly.
⚠ Warning: Never swap the yellow-green (ground) wire with live or neutral, and never omit it if your appliance originally had three wires – grounding is critical protection against electric shock on appliances with metal housings.
6 Secure the cable and reassemble the plug
Thread the cable through the strain relief collar so it holds the outer sheath firmly, not the bare wires, then return the housing and tighten the screw.
7 Test before use
Use a multimeter in continuity mode to check that live, neutral, and ground on the plug match the correct terminals, then plug the appliance into the outlet and test it works.
When to call a professional: If the job involves changes to the electrical panel, the main gas line, or load-bearing walls/beams — or if you're not sure how it will turn out — this is not a DIY task. Hire a licensed professional.
Final check
- The yellow-green wire is on the ground terminal, and no bare wire sticks out of any terminal
- The cable strain relief clamps the outer cable sheath, not the bare wires—you can't pull the cable loose by tugging
- The appliance works normally and the plug doesn't heat up after extended use
Common problems
- You broke a few strands of the stranded wire while stripping insulation.
- If more than a few strands are broken, cut off that section and strip the insulation again—a thinned wire will heat up there. Before connecting, twist the strands into a tight bundle or use a wire ferrule.
- The appliance works, but the plug gets noticeably warm in the outlet.
- One terminal is either loose or the contact pins don't seat properly. Unplug it, take it apart, and tighten all connections. If it keeps heating up, the problem is a worn outlet, not the plug.